Whitespacer
A few weeks ago I was analysing some packet captures and thanking the RFC gods that HTTP - and many other protocols - use ASCII/UTF-8 rather than packing everything into binary.
I then started thinking how confusing it would be to look at a packet capture and only see whitespace in the conversation. And thus whitespacer was born: a utility to encode messages into pure, soft, clean whitespace.
How It Works
Whitespacer has two modes: encoding and decoding. In encoding mode, it takes bytes from standard in, encodes them as whitespace characters, and writes them to standard out. Using the ‘-d’ switch on the command line moves it to encoding mode, taking the whitespace characters and decoding them back to the original bytes. You can find the full code (writen in C) on my github repo.
The encoding is a simple base-4 encoding. Each byte has its four groups of two bits encoded into one of four whitespace characters:
- 00 -> ‘\t’
- 01 -> ‘\n’
- 10 -> ‘\r’
- 11 -> ' ' (space)
In this article I’ll take you through the program itself, then some sections of code I found interesting to write.
The Program
The code has been compiled into an ELF file called ‘ws’. Let’s see what the encoding looks like piped into hexdump:
echo "Hello World!" | ./ws | hexdump
0000000 0d09 0a09 0a0a 0a0d 2009 0a0d 2009 0a0d
0000010 2020 0a0d 0909 090d 0a20 0a0a 2020 0a0d
0000020 090d 0a20 2009 0a0d 0a09 0a0d 090a 090d
0000030 0d0d 0909
0000034
You can see that the only bytes present are 0x9, 0xa, 0xd and 0x20: our whitespace characters. Encoding and then decoding (as it should) gives us our original string back.
echo "Hello World!" | ./ws | ./ws -d
Hello World!
Correctness
Let’s test it for correctness. We’ll generate a 128Kb file filled with random bytes and run these through the encoder/decoder.
# Create a 1Mb file full of random data
dd if=/dev/urandom of=urandom bs=1KB count=128

# Run the file through the encoder/decoder
./ws < urandom | ./ws -d > urandom.transfer

# Are the files the same?
md5sum urandom urandom.transfer
128+0 records in
128+0 records out
128000 bytes (128 kB, 125 KiB) copied, 0.00582111 s, 22.0 MB/s
0f92a99dd3e2556acf41097a9fc74037  urandom
0f92a99dd3e2556acf41097a9fc74037  urandom.transfer
The MD5 hashes are the same, implying it’s encoding and decoding each byte correctly. We can be doubly sure by looking at the distribution of byte values in the random file using a little bit of R.
tibble(
    bytes = readBin(
        file('urandom', 'rb'),
        what = 'integer',
        size = 1,
        signed = TRUE,
        n = file.size('urandom')
    )
) %>%
    ggplot() +
    geom_histogram(aes(bytes), binwidth = 1) +
    labs(
      title = 'Random Bytes From /dev/urandom',
      subtitle = 'Byte Distribution (total)',
      x = 'Byte Value',
      y = 'Frequency'
    )
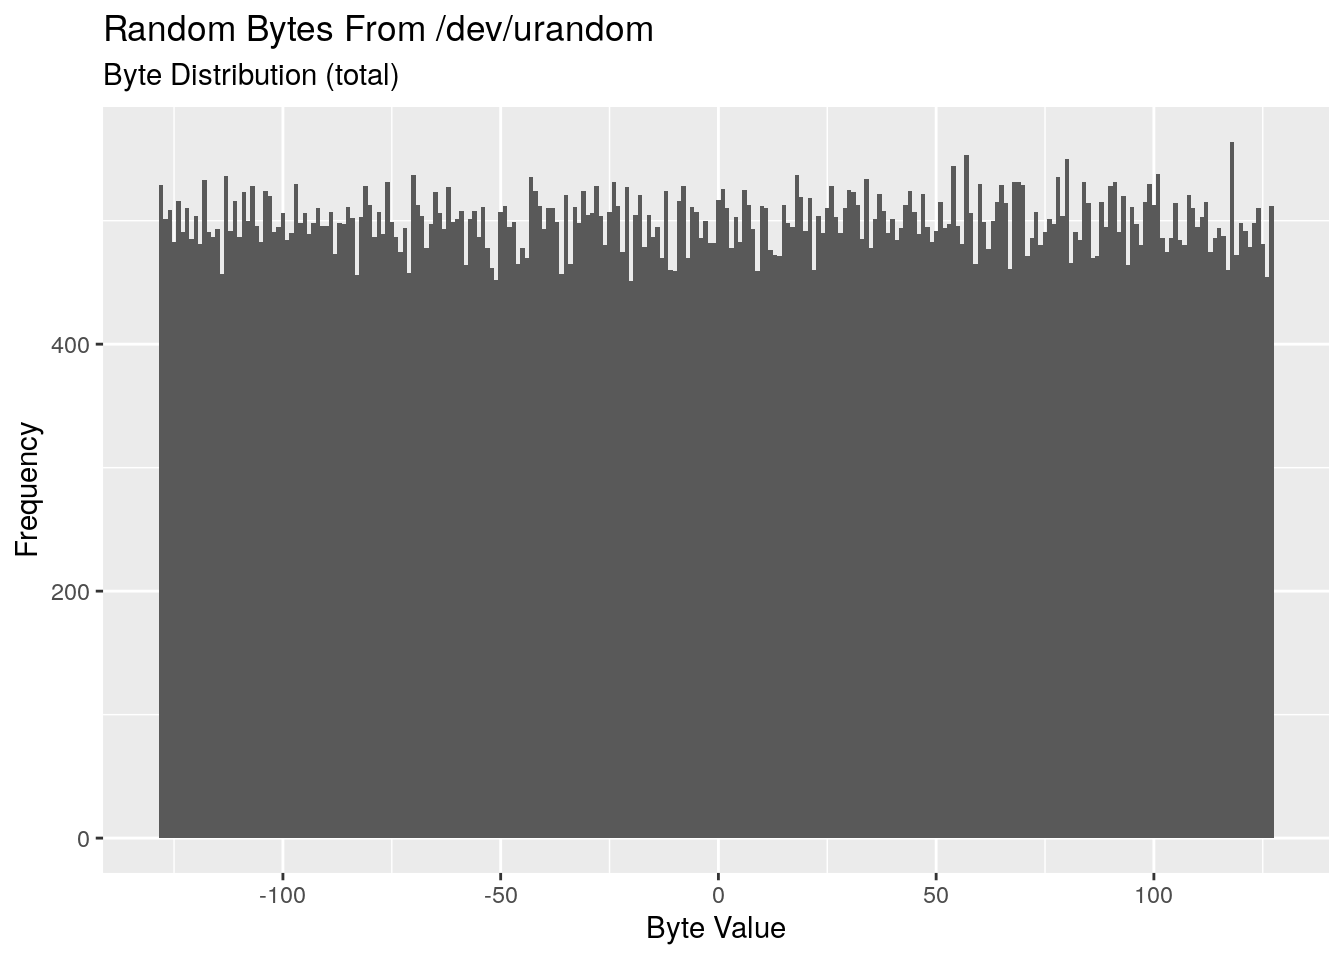
So we know that it’s encoded and decoded every byte value successfully. We now also know that /dev/urandom appears to be uniformly distributed.
Performance
We’ve tested it for correctness, but how fast does it run? We create a 3Gb file, ensure it’s cached in memory using fincore, available in the linux-ftools package. Unfortunately fincore doesn’t columnate very well, the last value is the percentage of the file in the cache.
# Create a 3Gb file full of random data
dd if=/dev/zero of=zero bs=100M count=30

# Read the file to add it to the cache
cat zero > /dev/null

# Confirm the file is in the cache
fincore --pages=false zero
30+0 records in
30+0 records out
3145728000 bytes (3.1 GB, 2.9 GiB) copied, 2.82209 s, 1.1 GB/s
filename size	total pages	cached pages	cached size	cached percentage
zero 3145728000 768000 768000 3145728000 100.000000
Next we perform a baseine without our encoder/decoder, measuring the throughput using the pipeviewer utility.
# Baseline without encode/decode
cat zero | pv -fa > /dev/null
[2.23GiB/s]
[2.33GiB/s]
Now we insert whitespacer into the pipeline:
# Check the throughput
cat zero | ./ws | ./ws -d | pv -fa > /dev/null
[ 237MiB/s]
[ 270MiB/s]
[ 254MiB/s]
[ 254MiB/s]
[ 262MiB/s]
[ 269MiB/s]
[ 271MiB/s]
[ 265MiB/s]
[ 271MiB/s]
[ 269MiB/s]
[ 272MiB/s]
[ 272MiB/s]
It’s a significant hit to throughput, but I don’t think it’s too bad.
Wireshark
Finally, at the start I talked about what it would look like in Wireshark, so let’s look at that. We set up a TCP listener on port 8080 piping to out decoder. We then enode a string and send it down this TCP session. We’ll take a packet capture at the same time.
# TCP listener and decoder
nc -l 8080 | ./ws -d &

# Encode, connect and send
echo "This is some text passed through TCP" | ./ws | nc -N localhost 8080
This is some text passed through TCP
Here’s what we see in Wireshark using the ‘Follow TCP Stream’ option:
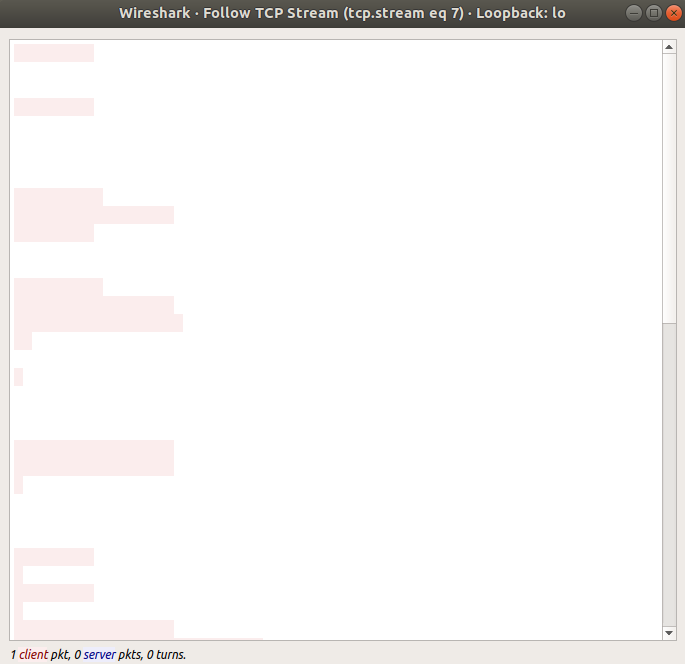
Exactly what I was looking for.
The Code
In this section I want to highlight a couple of sections of the code that I enjoyed writing, or had some nuance to them. This includes the lookup tables, the encoding function, and the read loop.
Lookup Tables
The lookup table used to encode the whitespace went through a few iterations. In the first version there was no lookup table. Instead I used four whitespace characters with contiguous byte values: ‘\t’, ‘\n’, ‘\v’, ‘\f’. This allowed the encoding and decoding to be a simple addition (encoding) and subtraction (decoding) of the lowest whitespace character’s value ('\t’ = 9).
The downside was that some of these characters weren’t rendered in Wireshark as whitespace, but rather as dots. I then moved to using the whitespace used in the current version, but with static encoding and decoding lookup tables. The encoding lookup table was four bytes, and the decoding lookup table was 256 bytes, with a canary value for bytes that aren’t valid whitespace in my encoding scheme.
I then realised I could do this a better way, and ended up with the following code:
unsgined char encode_lookup_tbl[] = { '\t', '\n', '\r', ' ' };
unsigned char decode_lookup_tbl[256];

void alloc_decode_lookup_tbl(void) {
    int x;

    //Fill the entire array with our canary
    for (x = 0; x < 256; x++) {
      decode_lookup_tbl[x] = LOOKUP_CANARY;
    }

    //Add the four encoding characters by using the inverse
    //of the encoding table
    for (x = 0; x < 4; x++) {
      decode_lookup_tbl[ encode_lookup_tbl[x] ] = x;
    }
}
The encode_lookup_tbl is a static array of the whitespace characters used in the encoding. But the the decoding lookup table is dynamically generated. It’s first filled with a canary value, then we use the inverse of the encoding table to generate the decoding table. I like the elegance of this: if we change the encoding, the decoding is automatically updated.
Encoding
The encoding also went through a couple of iterations. I first iterated only through the input bytes, and indexed the output bytes using x, x + 1, x + 2, etc.
The final encoding function ended up like this:
ssize_t ws_encode(
  const unsigned char *bytes_in,
  unsigned char *ws_out,
  const ssize_t bytes
) {
    int x, y;

    for (x = 0; x < bytes; x++) {
        for (y = 0; y < 4; y++) {
            ws_out[(4 * x) + y] = encode_lookup_tbl[
              (bytes_in[x] >> (2 * y)) & 0x03
             ];
        }
    }
    return x * 4;
}
I moved to a double loop, with x indexing into the input array, (4 * x ) + y indexing into the output array. I will admit that while I reduced the lines of code, I’ve probably made it much harder to interpret.
Reading
The reading loop when encoding is really simple: read bytes from standard in into a buffer, encode these bytes, then write them to standard out.
However decoding is a little more nuanced. The challenge is that there’s no guarantee how many bytes a read() system call will return; it could be anything between 1 to the size_t count variable you pass to it. For decoding, our decoded bytes come in as four byte blocks of whitespace. We need to make sure that we’re not passing a split block into our decoder.
To ensure this doesn’t occur, I keep track of the bytes read on each read call, and our position in the read buffer. If the number of bytes read is a multiple of four, we’re fine. If not, we need to go back and read more bytes until it is
- A multiple of four, or
- We’ve filled our input buffer, which is also a multiple of four bytes
I won’t post the read loop code, but you can see it here.
Summary
Is this a useful program? Probably not. Was it very difficult to write? There was some nuance, but it wasn’t too hard. It was however a fun project with a small and clearly defined scope. This made it enjoyable to work on in the handful of spare hours available to me.